Table of Contents
Ever rummaged through a cluttered pantry, only to find expired spices or duplicate items? You’re not alone. A disorganized space wastes time, money, and patience. But with smart solutions, even the messiest kitchen storage can become functional and stylish.
One homeowner’s 3-year pantry makeover proves it’s possible. Their journey from chaos to order saved hundreds by cutting food waste and duplicate buys. Best part? These fixes work for walk-ins or tiny spaces.
Simple upgrades like clear containers and labeled shelves make a huge difference. A well-planned system turns cooking into a breeze. Ready to reclaim your home’s hidden potential? Let’s dive in.
How to Organize Pantry: Start with a Clean Slate
Expired goods and forgotten ingredients? Time for a pantry reset. Clearing clutter isn’t just about tidying—it’s about reclaiming space and reducing waste. One study found households save $1,500 yearly by eliminating unused food.

Declutter expired and unused items
Adopt the “touch everything” method: Pull every item out and check dates. If it’s expired or stale, toss it. For duplicates, ask: “Will I use this in 3 months?” If not, add it to the donate pile.
Donate unopened, non-expired goods
Local food banks welcome sealed pasta, canned veggies, and cereal. Call ahead—some accept perishables like peanut butter. Pro tip: Group donations by category (breakfast, baking) to streamline drop-offs.
Create a pantry inventory list
Jot down what remains or use apps like Pantry Check. A visual list prevents overbuying—one family cut grocery trips by 30% just by tracking items. Update it weekly when restocking containers.
“A 30-minute purge saved me hours of searching later. Now I know exactly what’s in stock.”
Assess Your Pantry Layout and Shelving
Smart shelving turns chaos into order—measure first, arrange later. A well-designed system adapts to your space, whether you’re working with deep cabinets or narrow nooks. Start with a tape measure and these pro tips.

Measure shelf depth and spacing
Ideal depth ranges from 12–18 inches for most items. Shallow shelves (8–10 inches) suit spices, while deeper ones hold bulk bins. Leave 12 inches between shelves for cereal boxes and taller items.
Optimize vertical space with adjustable shelves
Track systems like ClosetMaid let you customize heights as needs change. For heavy jars, skip wire racks—they buckle under weight. One homeowner doubled storage by adding tiers to their existing shelving.
Consider DIY shelving for awkward spaces
Odd corners? Build custom ledges with plywood and brackets. The Handmade Home blog transformed a 10-inch gap into snack storage. For deep shelves, add pull-out drawers or front-facing bins.
“Adjustable shelves saved us during holidays. Extra space for baking supplies? Yes, please!”
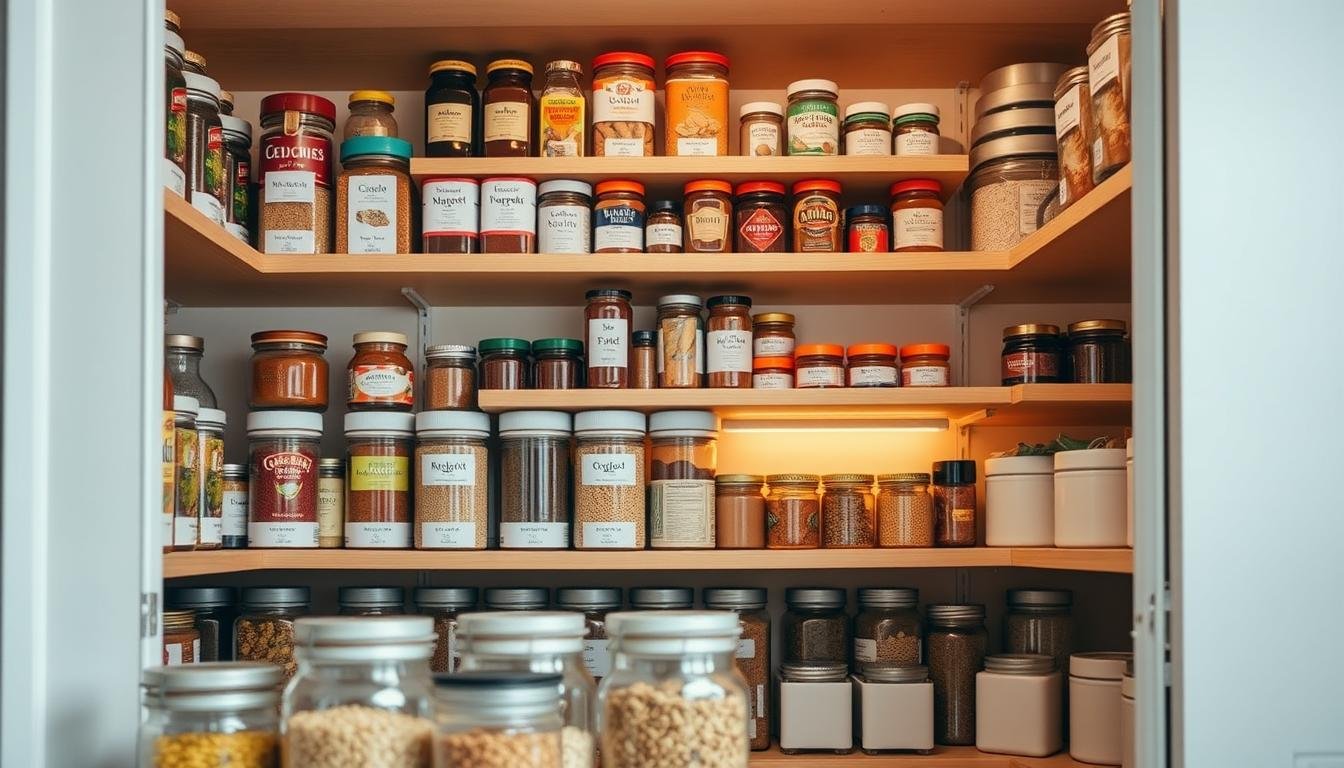
Clear Storage Containers: Your Pantry’s Best Friend
Clarity meets functionality with the right storage solutions. Transparent containers eliminate guesswork, keeping ingredients fresh and visible. Whether you’re storing flour or cereal, the right design saves space and sanity.

Choose airtight containers for dry goods
OXO Pop and Rubbermaid Brilliance lead the pack for sealing out moisture. Airtight designs preserve goods like pasta and rice for months. Test results show Rubbermaid kept cereal crisp for three weeks longer than cardboard boxes.
Prioritize stackable, transparent designs
Stackable storage containers maximize vertical space—OXO’s modular system fits 20% more items. Glass jars suit baking staples, while BPA-free plastic works for lightweight snacks. Pro tip: Uniform shapes prevent toppling.
Label containers for quick identification
Chalk markers or pre-printed labels save time during cooking sprints. For rotating stock, removable vinyl stickers work best. One baker swears by color-coding: blue for sugar, red for flour.
- Plastic vs. glass: Lighter but may stain vs. heavier but non-porous.
- Specialty picks: Flour dispensers with pour spouts, pet food bins with scoops.
- Budget hack: Repurpose large mason jars for bulk nuts or beans.
“Switching to clear bins cut my grocery time in half. No more buying duplicates!”
Create Functional Zones for Easy Access
Functional zones turn cooking from frustrating to effortless. By grouping similar items, you’ll slash search time and keep supplies visible. Think of it as a mini grocery store—everything in its aisle.

Group items by category
Assign dedicated areas for baking supplies, snacks, and breakfast staples. One home chef reduced meal prep time by 40% after creating a “spaghetti zone” with pasta, sauces, and spices together.
- Zone examples: Baking center (flour, sugar), snack HQ (granola bars, nuts), breakfast station (oats, cereal).
- Pro tip: Use The Container Store’s labeling system to mark each zone clearly.
Designate kid-friendly zones
Keep family favorites within reach. Low baskets with portioned snacks empower little ones to grab their own treats. Avoid spills by storing messy items like cereal in flip-top bins.
Use lazy Susans for corner storage
OXO’s turntable maximizes dead space in corners. Spin to access oils, vinegars, or jars without digging. One reviewer called it a “game-changer” for deep shelves.
“Zoning our pantry cut my grocery trips in half. Now, my teens know exactly where to put things back.”
Maximize Every Inch of Space
Dead corners and empty doors hold untapped potential for smart storage. With the right tools, even the tightest space becomes functional. Here’s how to leverage every nook.

Install Door-Mounted Racks for Spices
Wire or acrylic racks turn doors into spice hubs. The Container Store’s acrylic shelves fit 24 jars without crowding. For zip-top bags, add adhesive hooks or a mesh organizer.
Use Tiered Risers for Canned Goods
Expand-A-Shelf’s rotating risers display canned goods in tight spots. Two-tier designs fit soup cans, while three-tier versions hold small jars. No more digging behind rows!
Add Under-Shelf Baskets for Produce
Metal baskets slide under shelves to store onions or apples. For softer items like avocados, try fabric hammocks. Both options free up prime shelf real estate.
- Door storage: Spice racks, chip bag holders (vertical saves space).
- Floor solutions: Woven baskets for Costco bulk buys.
- Pro tip: Label riser tiers for faster grocery unloading.
“Door racks cut my spice search time to seconds. Now I actually use my paprika!”
Labeling Systems That Work
Labels transform chaos into order with just a glance. The right system helps everyone stay organized, from kids grabbing snacks to cooks mid-recipe. Whether you prefer sleek pre-printed labels or hands-on DIY projects, consistency is key.

Pre-printed versus DIY options
Pre-printed labels save time—Cricut’s 648-label book covers everything from spices to baking staples. For custom needs, Brother P-touch creates durable laminated tags. DIY lovers can use chalk markers or removable vinyl for seasonal products.
| Type | Best For | Durability |
|---|---|---|
| Pre-printed | Standard pantry items | High (waterproof) |
| Chalkboard | Rotating stock | Medium (rewritable) |
| Removable vinyl | Kids’ zones | Low (repositionable) |
Zone labels for family navigation
Color-coded sections make finding items intuitive. Try shelf-edge labels for zones like “Breakfast” or “Baking.” ADA-compliant large-print versions help visually impaired members. One mom reported fewer spilled cereals after labeling snack bins with emoji stickers.
Flexible chalkboard or removable tags
Chalkboard labels adapt to changing needs—perfect for bulk bins or meal prep containers. Removable dot systems mark expiration dates discreetly. Pro tip: Use metallic markers on dark surfaces for better visibility.
- Budget pick: Repurpose washi tape + Sharpie for temporary tags
- Kid hack: Picture labels for pre-readers
- For renters: Adhesive putty won’t damage shelves
“Color-coded labels ended our ‘Where’s the cumin?’ debates. Even my husband remembers now!”
Small Pantry? No Problem!
Tight on room? Clever storage hacks can make any small area work. Even a 3-foot nook can hold a week’s groceries with strategic planning. Focus on vertical storage and multi-purpose solutions to maximize every inch of space.

Shallow shelves save narrow spaces
Designer Daniel Kanter recommends 6–8 inch deep shelves for tight walls. These hold spices, cans, and jars without wasting space. For renters, ladder shelves offer similar flexibility—no installation needed.
Repurpose bookcases or cabinets
IKEA’s PS Cabinet doubles as a sleek pantry with adjustable shelving. Turn a basic bookcase into dry-goods storage with baskets or bins. Pro tip: Add casters for mobility in tiny home kitchens.
Hang wire racks for extra storage
Over-the-door wire racks hold snacks or spices. Wall-mounted acrylic shelves keep oils visible yet tidy. For corners, tension rods create instant hanging spots for lightweight cabinets.
- Narrow solutions: 6-inch shelves for baking sheets, pegboards for utensils.
- Renter-friendly: Adhesive hooks, stackable crates, or rolling carts.
- Pro hack: Use a curtain rod under shelves to hang reusable bags.
“Swapping deep shelves for shallow ones gave me 30% more storage. Now I can actually see my coffee stash!”