Table of Contents
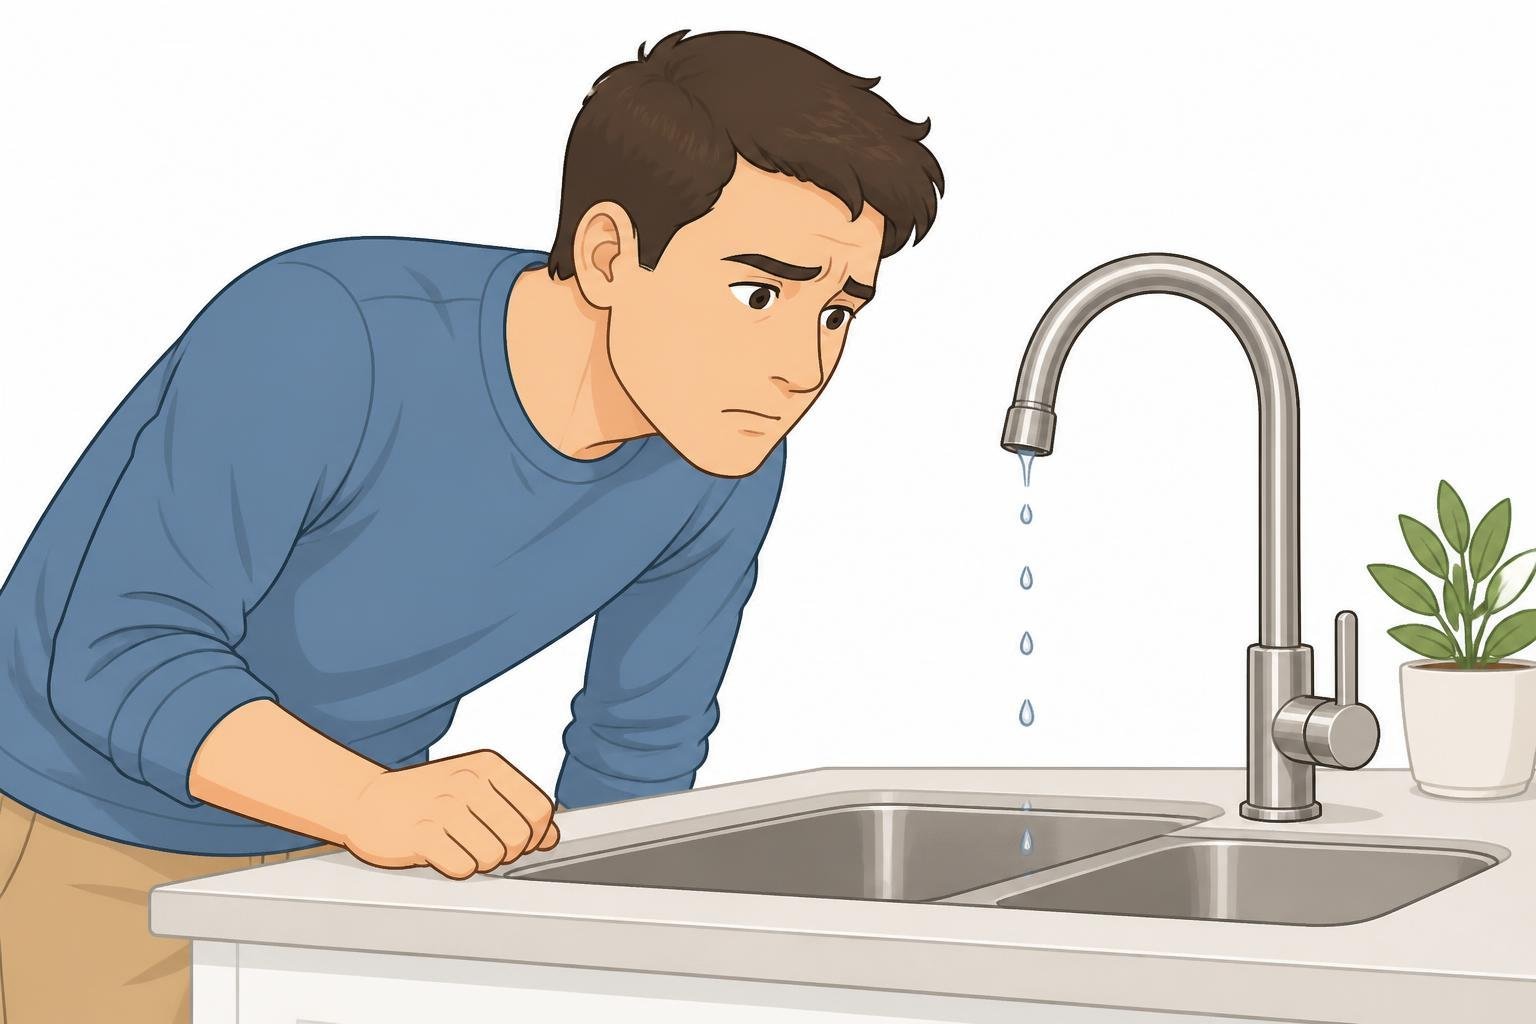
That drip-drip-drip sound at 2 a.m. isn’t just annoying — it’s costing you real money. A single leaky faucet can waste more than 3,000 gallons of water a year, according to the EPA. That shows up on your water bill whether you fix it or not.
The good news? Most faucet leaks are a $5 fix. You don’t need plumbing experience or a truck full of tools. You need about an hour, the right replacement part, and this guide.
Here’s how to fix a leaky faucet — start to finish.
What Type of Faucet Do You Have?
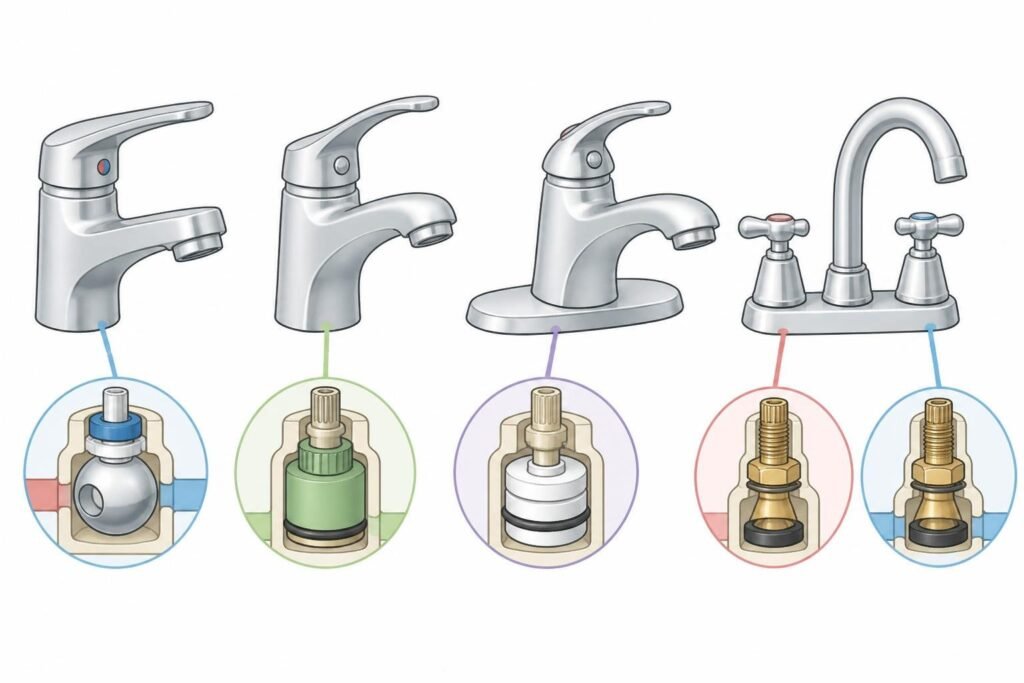
Before you touch a single screw, you need to know your faucet type. The repair steps are completely different depending on what’s under the handle. Grab the wrong part at the hardware store and you’re making two trips.
There are four main types:
- Ball faucet — A single handle that rotates over a rounded ball-shaped cap. Common in kitchens. Has a ball bearing inside that controls water mix and flow.
- Cartridge faucet — Single or double handle. Has a cartridge inside that moves up/down to control water. Very common in bathroom setups.
- Ceramic disc faucet — Single lever over a wide cylindrical body. Uses two ceramic discs instead of rubber parts. Durable, but the discs can crack.
- Compression faucet — Two separate handles (hot or cold). Older style. Uses a rubber washer that compresses against a seat to stop water flow. Most common source of leaks in older homes.
Not sure which you have? Search your faucet brand and model number — it’s usually stamped on the base or inside the cabinet on the supply lines.
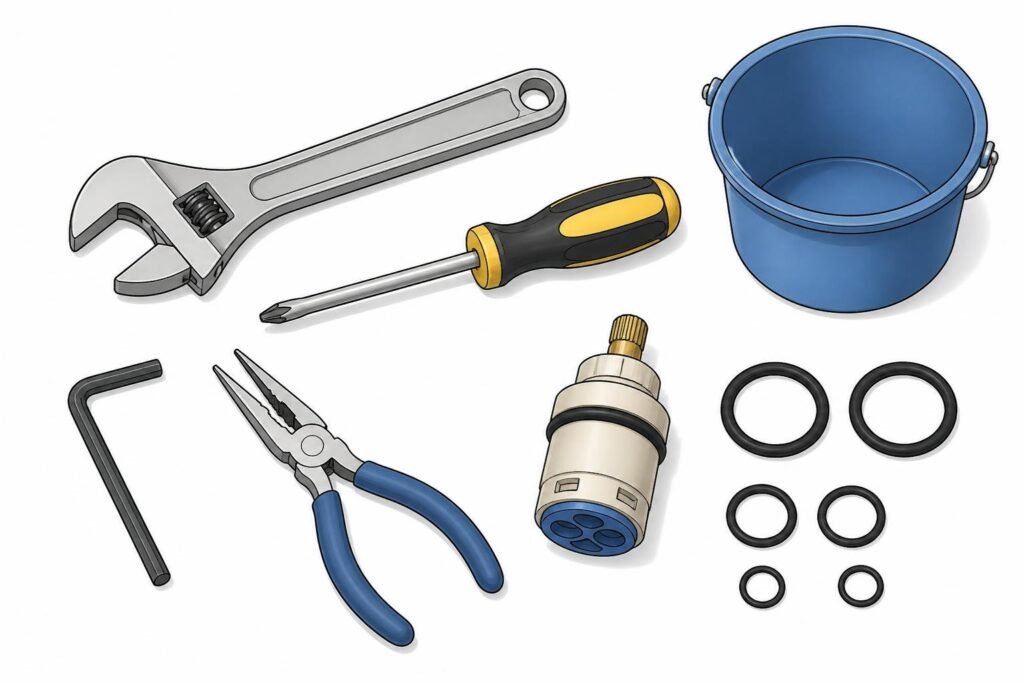
Gather Your Tools Before You Start
Nothing slows down a repair faster than stopping mid-job to find a screwdriver. Get everything together first.
You’ll need:
- Adjustable wrench
- Phillips and flathead screwdriver
- Allen wrench (hex key set)
- Needle-nose pliers
- Replacement parts (washer, o-ring, cartridge, or ball — depends on faucet type)
- Plumber’s grease
- Plumber’s tape (thread seal tape)
- A cloth or small towel
- A small bucket or bowl
You can buy a faucet repair kit at any hardware store for $10–$20. These kits include the most commonly replaced small parts — washers, o-rings, springs — all in one package. Bring your faucet brand and model number so you get the right fit.
Step 1: Turn Off the Water Supply
This sounds obvious, but skipping it turns a small repair into a flood.
Look underneath the sink for two shut-off valves — one for hot water, one for cold water. Turn them clockwise until they stop. If you’re working on a bathroom faucet, the valves are typically right there under the sink. For a leaky tub faucet or shower faucet where there’s no local shut-off, you’ll need to turn off the water at the main supply valve for your home.
Once the valves are closed, turn on the faucet to release any remaining pressure and drain what’s left in the line. Put a cloth or towel in the sink basin to catch small parts — a dropped screw cover or spring down the drain means starting over.
Turn the water fully off before doing anything else. Seriously.
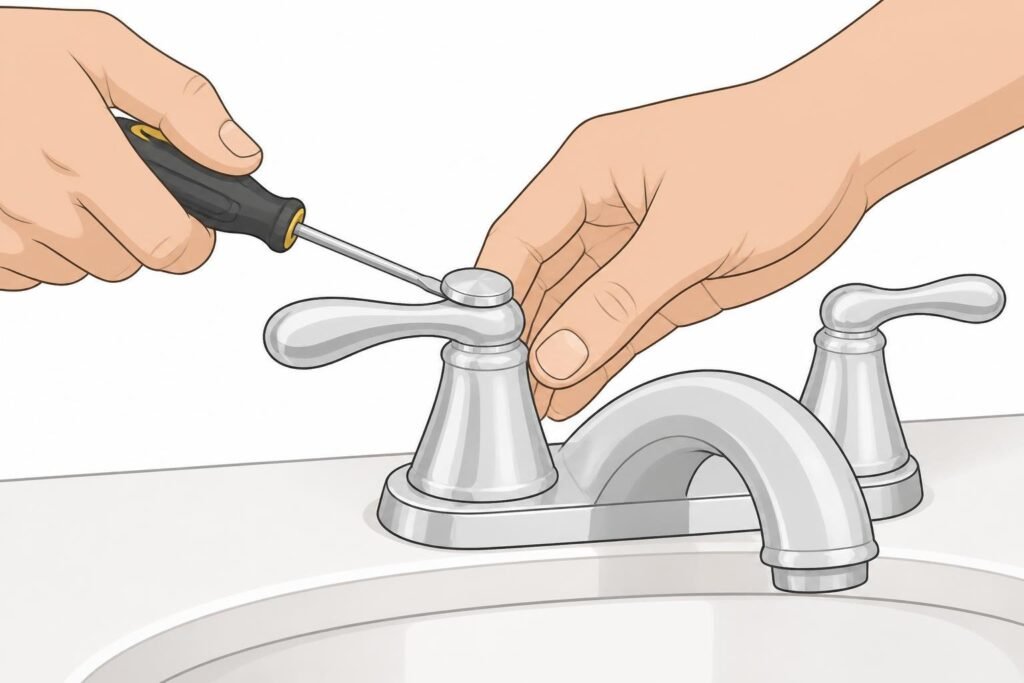
Step 2: Remove the Faucet Handle
This is where most people get stuck because the screws aren’t always visible. Faucet handles almost always hide their screws under a decorative cap.
Here’s how to remove the faucet handle:
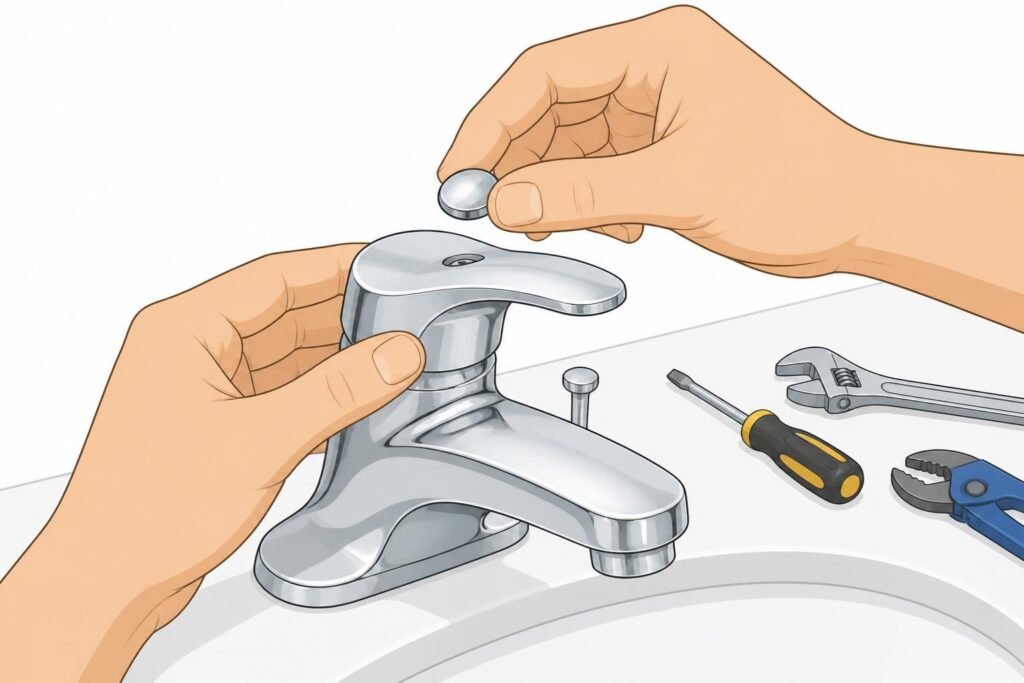
- Look for a small decorative cap on top of or at the back of the handle. Use a flathead screwdriver to pry it off gently — don’t force it or you’ll crack it.
- Underneath that cap is the screw holding the handle to the stem. It’s usually a Phillips screw, but some brands use an Allen screw.
- Use a screwdriver or the right size Allen wrench to remove the screw.
- Lift off the handle straight up. If it’s stuck, wiggle it gently while pulling up. Don’t yank.
Some bathroom faucets have a collar or decorative sleeve beneath the handle — unscrew and remove that too before going deeper.
Step 3: Find the Source of the Leak and Replace the Worn Part
Now you’re getting to the actual faucet repair. What you do next depends entirely on your faucet type.
Compression Faucet: Replace the Washer
With the handle off, use an adjustable wrench to unscrew and remove the packing nut. Beneath it is the stem. Pull the stem out — it may twist out or pull straight up depending on the model.
At the bottom of the stem, you’ll find a rubber washer held by a brass screw. This washer is almost certainly your leak source. Unscrew it and take it to the hardware store to match the size exactly. While you’re there, inspect the o-ring on the stem — replace it if it looks cracked or worn.
Cartridge Faucet: Replace the Cartridge
Once the handle is off, you’ll see the cartridge — a cylindrical component held in place by a retaining nut or clip. Use needle-nose pliers to remove the retaining clip if there is one, then pull the cartridge straight out.
Take the old cartridge to the store and match it exactly. Installing the wrong cartridge is one of the most common repair mistakes. When you’ll need to replace the cartridge, note which direction it’s facing before you pull it — it has to go back in the same way or your hot and cold will be reversed.
Ball Faucet: Replace the Ball, Springs, and Seats
Ball faucets have the most components. With the handle off, use an Allen wrench to remove the cap and collar, then use needle-nose pliers to lift out the ball bearing, springs, and rubber seats beneath it.
Inspect each piece. The springs and rubber seats wear out fast and are almost always the leak source. A ball faucet repair kit will include all of these parts — just swap everything at once while you’re in there.
Ceramic Disc Faucet: Clean or Replace the Disc Cylinder
Under the handle is a disc cylinder. Remove the screws holding it in and lift it out. Inspect the ceramic discs — if they’re cracked or chipped, you’ll need to replace the entire cylinder assembly. If they look okay, clean them with white vinegar and a soft cloth to remove any mineral buildup, then reassemble.
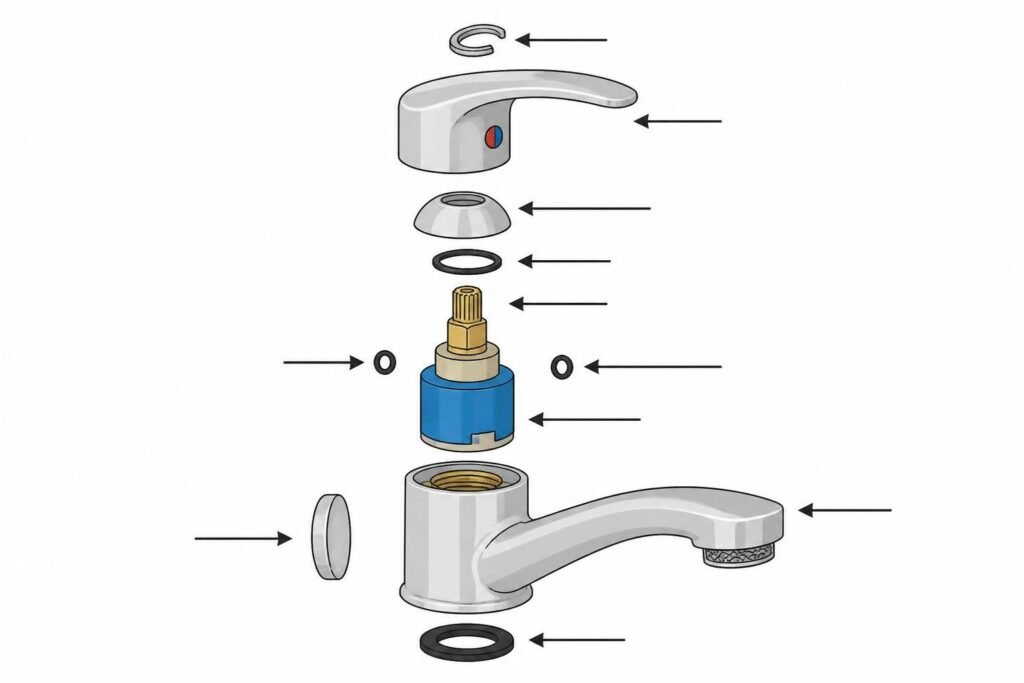
Step 4: Inspect the Valve Seat and O-Rings
While everything is apart, take 60 seconds to check two more things.
Run your finger inside the faucet body where the valve seat sits. If it feels rough or pitted, that surface is damaging your new washer and the leak will come back fast. A seat wrench (a cheap tool) can resurface it, or you can replace the seat entirely.
Also inspect every o-ring you can see. O-rings are the small rubber rings that seal joints between components. They dry out, crack, and flatten over time — especially in bathrooms with hard water. If an o-ring looks even slightly deformed, replace it. They cost pennies.
Step 5: Reassemble the Faucet
Put everything back together in reverse order. Work carefully — cross-threading a nut or over-tightening can crack the faucet body and turn a $5 repair into a replacement job.
A few things to keep in mind when you reassemble:
- Apply plumber’s grease to new o-rings and rubber parts before installing. This keeps them from tearing during assembly and extends their life.
- Use plumber’s tape on threaded connections to get a better seal and prevent future leaks.
- Tighten firmly but not brutally. Snug is enough. If you feel resistance, stop — you’ve likely fully seated the component.
- Make sure the cartridge is oriented correctly before you lock it in. Most have a tab or flat edge that aligns with a slot in the faucet body.
Once everything is back in place, put the handle back, insert and tighten the screw, and snap the decorative cap back into place. Don’t forget to put the handle back the right way — the cold side should face the direction marked on the faucet.
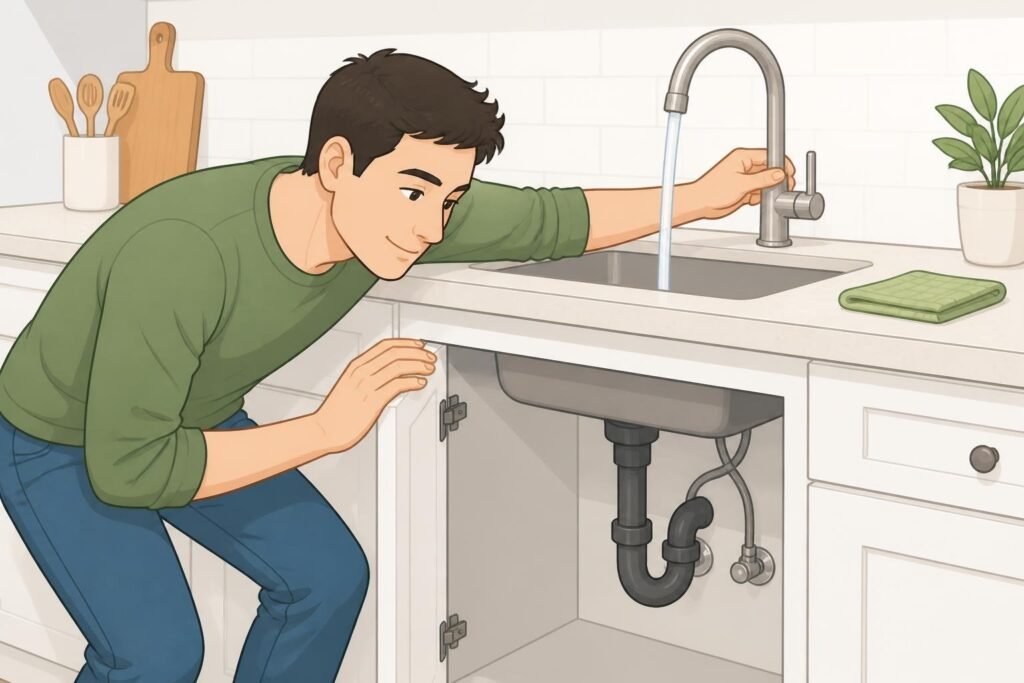
Step 6: Turn the Water Back On and Test Your Work
Slowly turn the shut-off valves back on — counterclockwise — one at a time. Don’t crank them open fast. Let the water pressure build gradually so you can catch any new leaks before they become a problem.
Once the water is back on, watch carefully:
- Check beneath the sink for drips around the supply lines and shut-off valves
- Turn the faucet on and off several times to test the handle action
- Let the faucet run for 30 seconds, then turn it off and watch the spout for dripping
If the faucet is leaking from the spout after reassembly, the part wasn’t seated correctly. Turn the water off and take another look — usually a washer or cartridge just needs to be re-seated.
If it’s leaking from around the base of the handle, an o-ring is either the wrong size, not fully seated, or was installed dry. Add grease and try again.
When to Call a Plumber Instead
Most leaky faucet repairs are genuinely DIY-friendly. But there are a few situations where you should call a plumber instead of pushing through on your own.
Call a professional if:
- The leak is coming from inside the wall or from a pipe, not the faucet fixture itself
- You turn off the shut-off valve and it doesn’t stop the water flow (the valve itself is failed)
- The faucet body is visibly cracked or corroded — installing new parts in a damaged fixture just delays the problem
- You’ve replaced the parts correctly but the leak persists through two repair attempts
- You’re dealing with a leaky tub faucet or shower faucet that requires cutting into tile or the wall to access the valve
There’s no shame in calling a plumber for situations outside your skill level. Damage from a botched repair almost always costs more than the plumber would have.
Save Money by Fixing It Yourself
A plumber typically charges $100–$250 to fix a leaky faucet — mostly labor. The actual parts usually run $5–$30. When you learn how to fix a leaky faucet yourself, you’re not just handling this one repair. You’re building a skill you’ll use on every faucet in the house for the rest of the time you live there.
The steps are the same whether it’s a leaky kitchen faucet, a leaky bathtub faucet, or a dripping shower faucet — identify the faucet type, get the right replacement part, swap it out, and reassemble. That’s it.
Turn off the water, take apart what needs to come apart, replace what’s worn, and put it back together. The first repair takes an hour. The second one takes twenty minutes.