Table of Contents
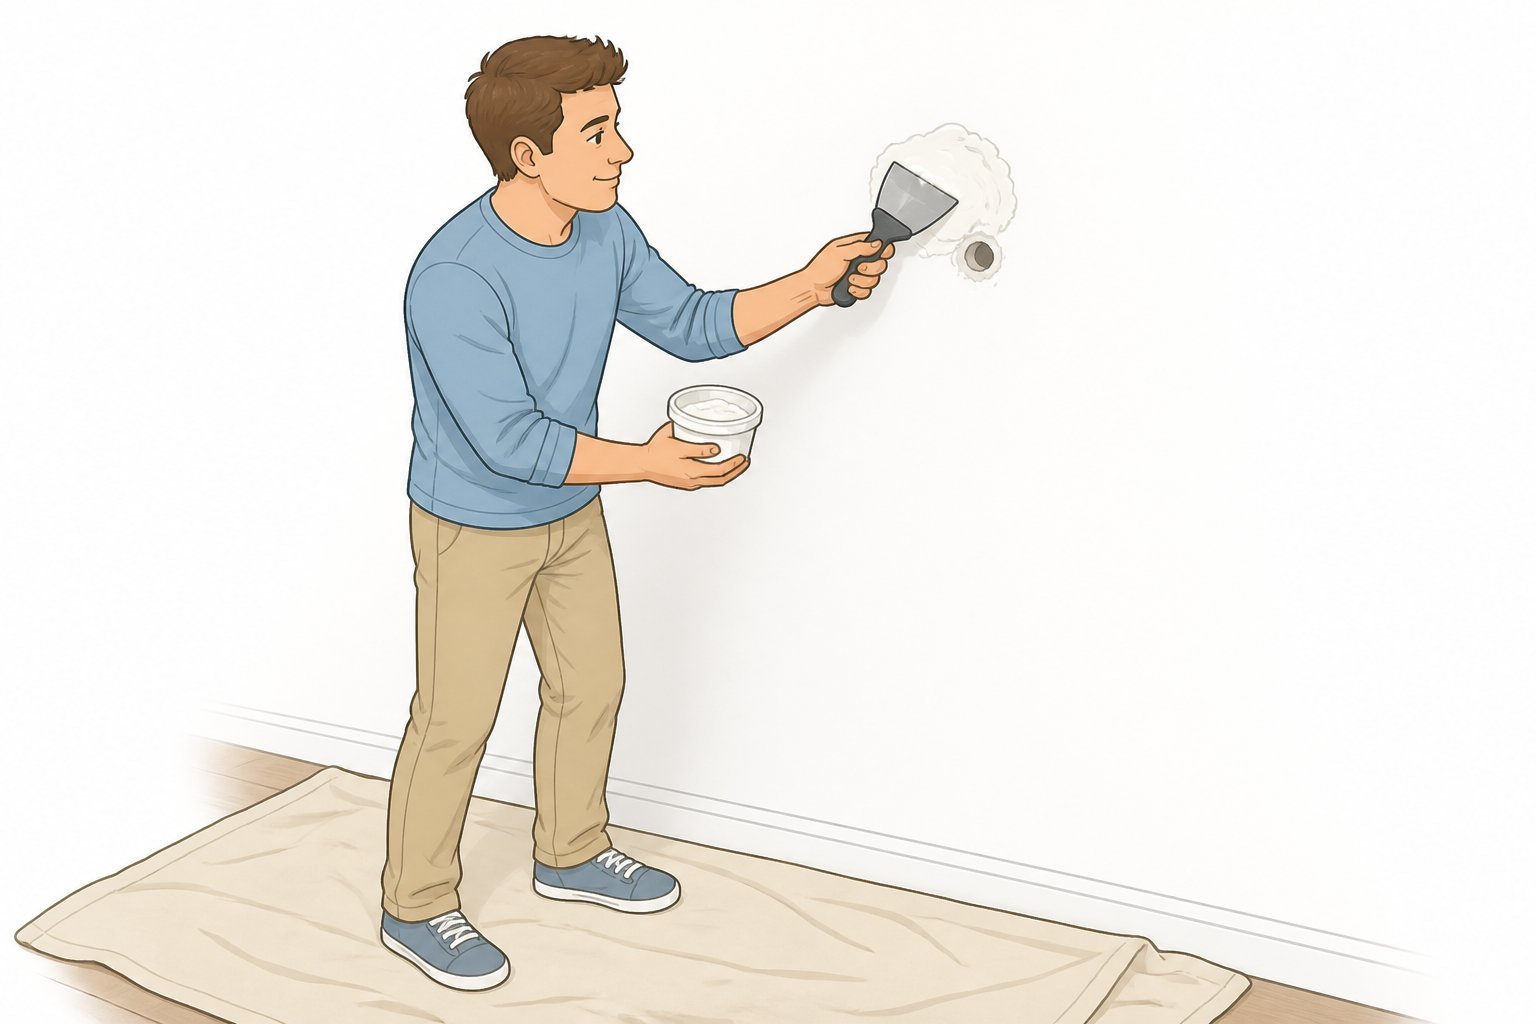
There’s a fresh hole in your wall. Maybe the door swung open too hard and the knob punched through. Maybe you yanked a TV mount off and took half the drywall with it. Or maybe you’re moving out next week and that nail collection above the bed suddenly looks like Swiss cheese.
Here’s the truth most people don’t know: patching drywall is one of the easiest home repairs you can do. A nail hole takes 30 seconds. A doorknob-sized hole takes 20 minutes of work plus a few hours of drying time. Even a major drywall repair — fist-sized or bigger — costs maybe $15 in supplies and a Saturday afternoon.
You don’t need a handyman. You don’t need experience. You need the right tools and the right method for the size of the hole in front of you. Let me show you both.
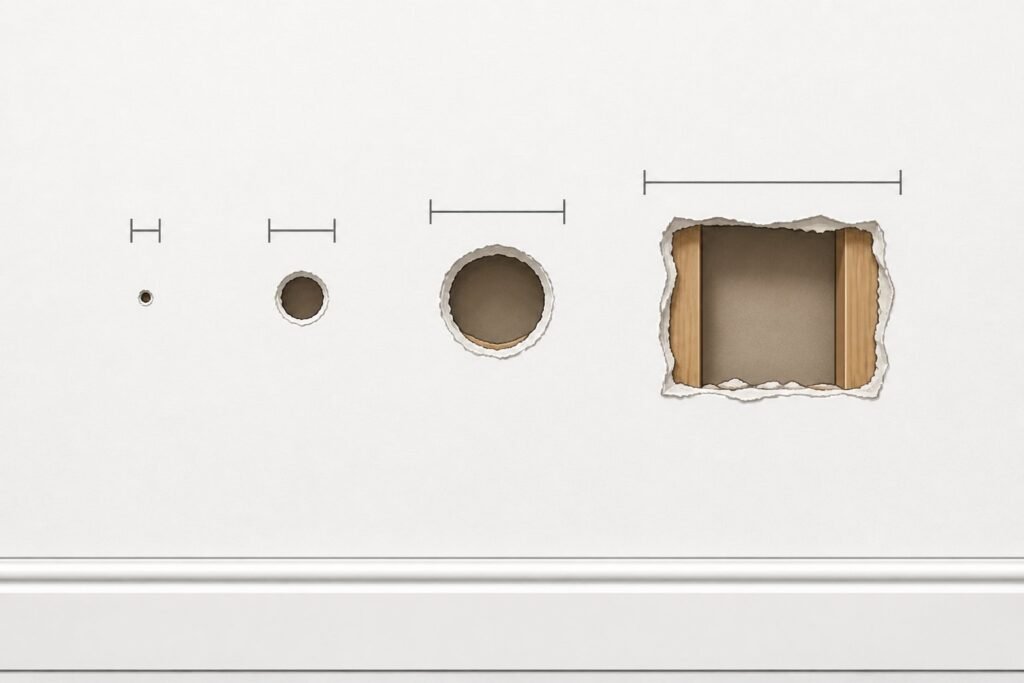
First: Figure Out the Size of the Hole
Before you touch anything, look at what you’re dealing with. Drywall repair scales to the damage, and using the wrong method wastes time and material.
Pinholes and nail holes are under ¼ inch. Think pushpins, finishing nails, hanging hooks. Spackle handles these in seconds.
Small holes run ¼ inch to about 1 inch — anchor holes, screw holes left after you removed a wall plug. These need spackle plus a little patience.
Medium holes are 1 to 6 inches. This is the classic doorknob-through-the-wall situation. You’ll need a drywall patch kit.
Large holes are anything over 6 inches, or any hole big enough that a patch kit won’t span it. These need a new piece of drywall cut to fit.
Take a tape measure to your damaged area before you head to the hardware store. The wrong-size patch kit is just wasted money.
Tools and Materials You’ll Need
Most of this stuff lives in any decent toolbox. For minor repairs, you might already have everything but the spackle.
For small to medium holes:
- Spackling compound or joint compound (the small tub is fine)
- Two putty knives — a 1.5-inch and a 6-inch
- Medium-grit and fine grit sandpaper, plus a sanding sponge
- A self-adhesive mesh drywall patch (for holes over 1 inch)
- Primer
- Paint matching the rest of the wall
- A damp rag
For larger holes, add:
- A small piece of drywall (also called sheetrock)
- A utility knife or drywall saw
- Two thin furring strips or scrap wood for backing
- Drywall screws
- Paper joint tape or fiberglass mesh tape
Total cost if you’re starting from zero: about $30. A patch kit alone runs $5-8.
How to Patch Nail Holes and Pinholes
The smallest holes are almost embarrassingly easy. Use spackle, a small putty knife, and 60 seconds.
- Wipe around the hole with a damp rag to clear dust.
- Scoop a pea-sized bit of spackle onto the tip of your putty knife.
- Press it into the hole and drag the knife flat across the wall to scrape away the excess.
- Let it dry completely (15-30 minutes for most spackles — check the tub).
- Lightly sand with fine-grit sandpaper until smooth.
- Touch up with paint.
Done. A wall full of nail holes from old picture frames can be erased in 10 minutes. If you’ve ever wondered whether to bother before moving out, the answer is yes — this is the cheapest deposit insurance there is.
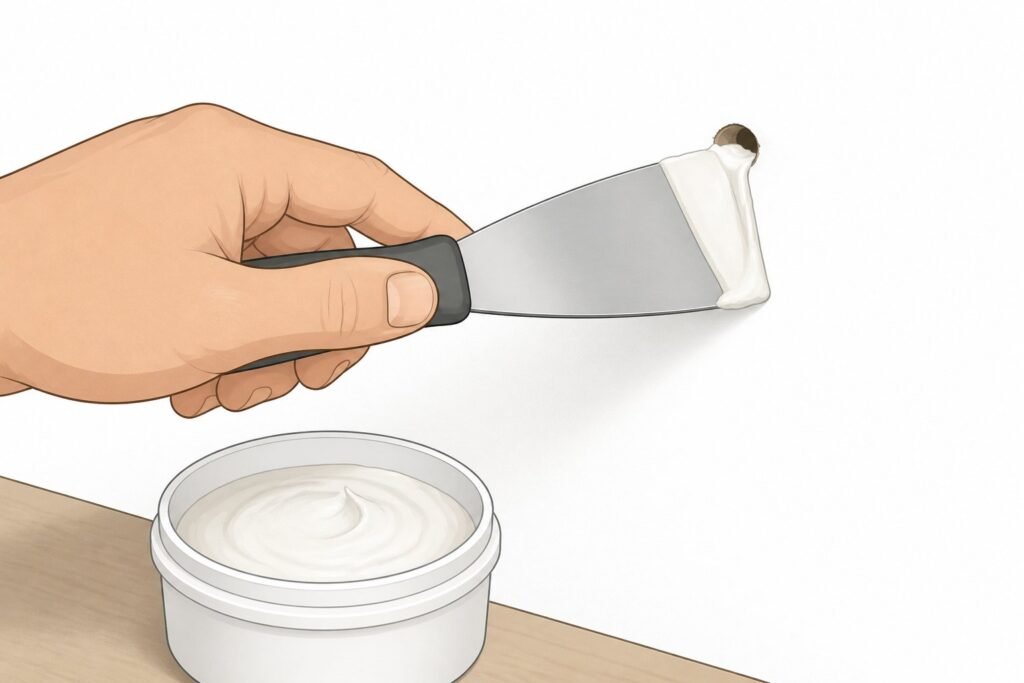
How to Patch a Small Hole (Up to 1 Inch)
Anchor holes, screw holes, and the random dings life leaves behind. The method’s almost the same as nail holes, with one extra step for anything bigger than a pencil eraser.
If the hole has loose drywall around the edges, take a utility knife and trim away any ragged paper. You want a clean opening.
For holes around half an inch, ball up a piece of paper towel and push it just inside the hole. This gives the spackle something to grip. Then:
- Apply a thin layer of spackle with the small putty knife.
- Let it dry fully.
- Apply a second layer slightly wider than the first, feathering the edges out beyond the hole.
- Let it dry, then sand smooth.
- Prime, then paint.
Two thin layers always beat one thick one. Thick spackle cracks as it dries. Thin layers cure fast and stay put.
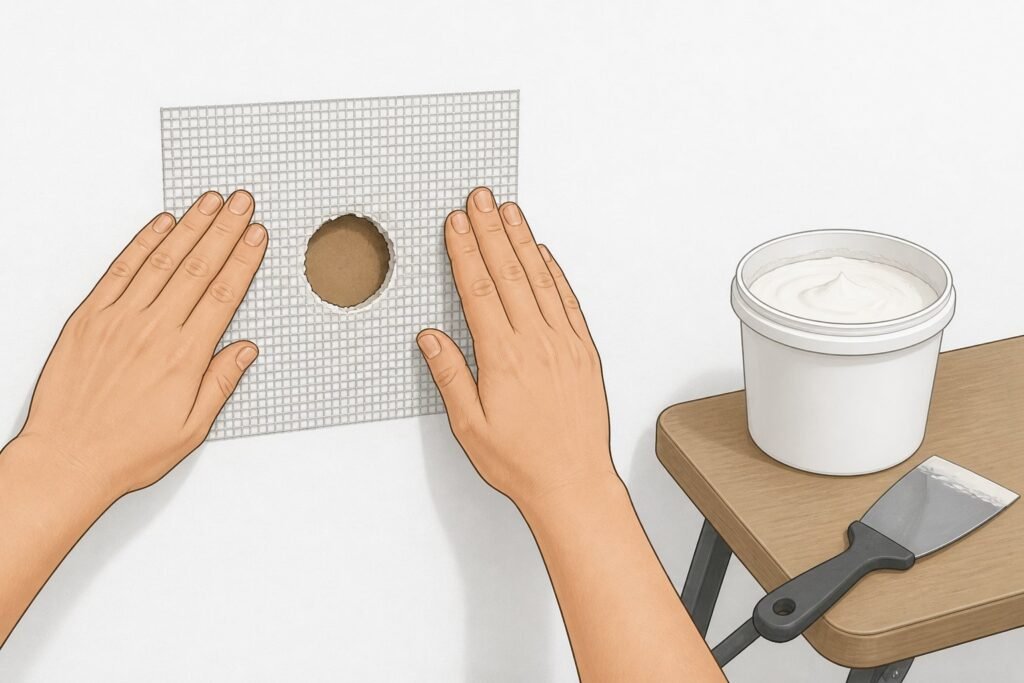
How to Patch a Medium Hole (1 to 6 Inches)
The doorknob hole. The most common drywall headache in the world, and the one that scares people the most. The fix is still under 30 minutes of active work.
You’ll need a self-adhesive mesh drywall patch — a small square or rectangle of metal mesh with sticky backing. They come in 4×4 and 6×6 inch sizes for around $5.
Step-by-Step Instructions
- Clean up the hole. Use a utility knife to trim away any loose drywall around the hole. Aim for clean edges.
- Stick the patch over the hole. Peel the backing off the mesh patch and press it flat onto the wall, centering the metal piece over the opening. Smooth it down so it lies completely flat.
- Apply your first layer of joint compound. Use the 6-inch putty knife to spread a thin layer of joint compound over the entire patch, pressing it into the mesh. Feather the edges out about an inch beyond the patch in every direction.
- Let it dry completely. Usually 4-6 hours, or check the label. If it still looks gray or feels cool to the touch, give it more time.
- Add a second layer. Apply another thin layer of joint compound, this time feathering out 2-3 inches beyond the first layer. Two coats are almost always enough, but a third doesn’t hurt.
- Sand smooth. Once the final coat is fully dry, sand with medium grit first, then fine grit, until the patched area feels level with the rest of the wall. Run your hand across it with your eyes closed — your fingers will catch ridges your eyes miss.
- Prime, then paint. A coat of primer on the repaired area first, then paint. Skipping primer is the #1 reason patches show through.
The biggest mistake people make at this stage? Going too thick. A glob of compound dries to a visible lump. Three thin coats look invisible.
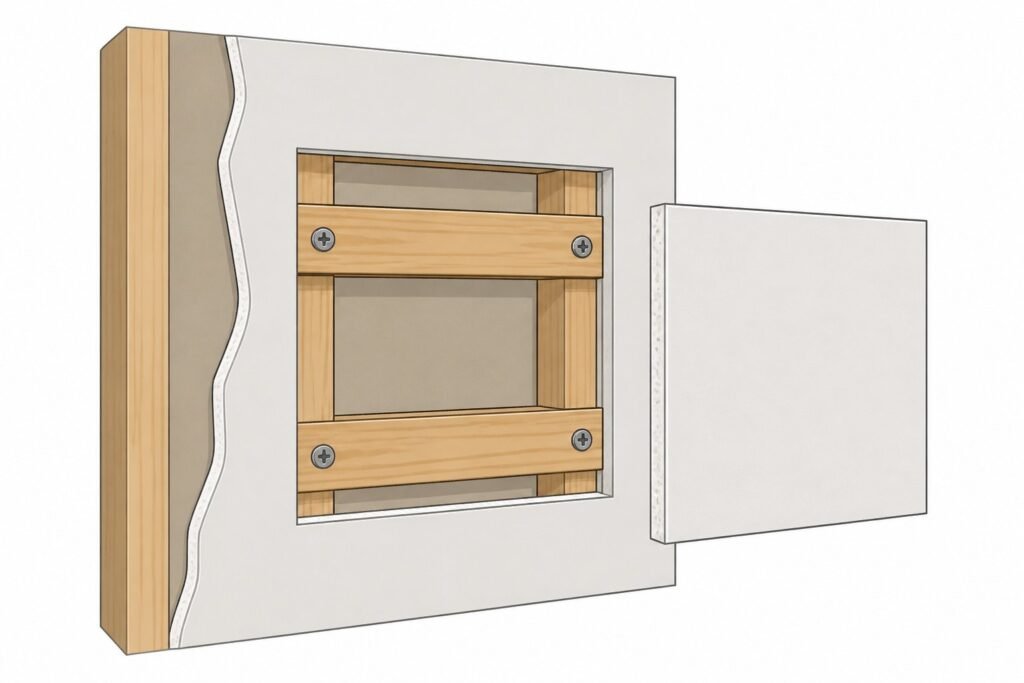
How to Patch a Large Hole with New Drywall
For wall holes bigger than 6 inches — or any hole where a mesh patch would sag — you need to install a new piece of drywall. This is the only fix that scares people, but it’s just careful cutting plus the same compound work as a medium patch.
Step-by-Step
- Square off the hole. Use a utility knife or drywall saw to cut the damaged area into a clean square or rectangle shape. This makes everything that follows easier.
- Cut backer strips. Take two pieces of scrap wood (1×2 furring strips or similar) longer than the hole is wide. Slide them through the hole behind the wall, hold them flush against the back of the existing drywall, and drive drywall screws through the wall into each end of the strips. The strips will hold your new patch.
- Cut a new piece of drywall to fit. Measure your squared-off hole and cut a piece of drywall to match — slightly smaller is fine, ⅛ inch gap on each side is normal.
- Screw the new patch in. Place the new piece of drywall into the hole and drive drywall screws through it into the backer strips. Sink the screw heads just below the surface.
- Tape the seams. Press paper or mesh joint tape over every seam where the new drywall meets the old.
- Apply joint compound in three coats. First coat covers the tape. Second coat feathers out 4-6 inches. Third coat feathers another 2-3 inches wider. Let each coat dry fully before the next.
- Sand, prime, paint. Same finishing process as the medium hole repair.
The whole job takes about an hour of active work, spread across a day or two of drying time. A handyman charges $150-300 for the same job. The materials cost you $20.
Sanding, Texturing, and Painting for a Seamless Finish
Anyone can spackle. The difference between a patch you can spot from across the room and a flawless wall comes down to the finishing.
Sand More Than You Think
Drag a work light close to the wall and turn it on at a low angle. Shadows reveal every bump and ridge. Sand until the patched area feels smooth and the light shows no high spots. A sanding sponge works better than flat sandpaper for blending edges into the rest of the wall.
Match the Texture
If your walls have texture — orange peel, knockdown, popcorn — a flat patch will scream for attention. Spray-can wall texture kits ($8-12) match most common patterns. Spray a test card first to dial in the spray distance and pattern.
For smooth walls, no texture work needed.
Always Prime First
Joint compound and spackle are thirstier than paint. Without primer, the patched spot soaks up paint differently than the rest of the wall and shows as a duller patch in a certain light. A quick coat of primer fixes this entirely.
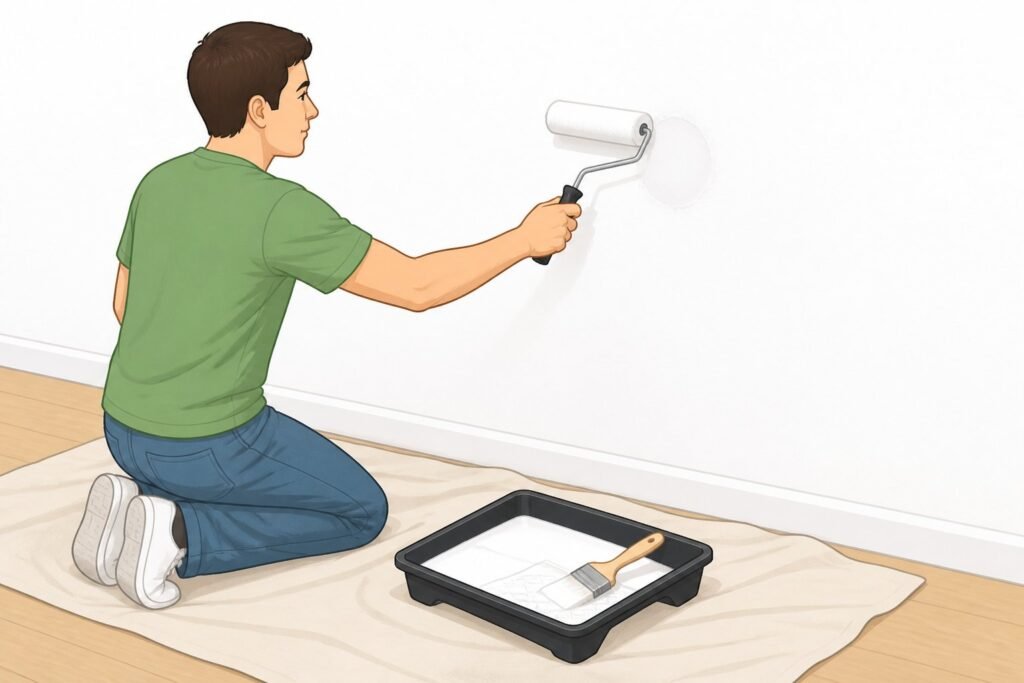
Roll, Don’t Brush
Use a roller to apply paint over the patched area, and roll out past the edges. A brushed-on touch-up almost always shows. Rolling blends the new paint into the existing finish so the repair disappears.
If you can still see the patch after one coat, hit it with a second.
Pro Tips and Common Mistakes
A few things that separate clean repairs from blemishes that haunt your wall forever.
Don’t use spackle for medium or large holes. Spackle dries fast but shrinks. For anything bigger than a screw hole, use joint compound — it’s stronger and holds shape.
Feather wide, then wider. Each coat of compound should extend beyond the edges of the one before. By the third coat, you should be feathering 4-6 inches past the original hole. That’s how patches disappear.
Let everything dry completely. Sanding compound that’s still slightly damp gums up sandpaper and leaves smears. If you’re not sure, give it another hour.
Save a small jar of your wall paint. Even better, take a chip to the paint store and have them match it before you need it. Old paint fades over time, so a fresh “match” sometimes isn’t.
Don’t try to patch a doorknob hole without a backer. A glob of spackle alone won’t span more than half an inch. Use a patch kit or backer strips. Always.
Check what’s behind the wall before drilling or cutting. Look for outlets, light switches, or anywhere a pipe or wire might run. A stud finder with electrical detection is $20 well spent.
When to Call a Pro
Most wall holes are a DIY project. But a few situations deserve a phone call.
If the hole goes through both layers of a wall and you can see into the next room, leave it to a pro. Same goes for holes near electrical boxes, plumbing, or anywhere you spot wires or pipes. And if the damage is from water — staining, soft spots, bubbling paint — fix the leak before patching anything, or the patch will fail in months.
For everything else, your putty knife and a $5 tub of spackle can handle it.
The Last Word
Learning how to patch a hole in the wall pays for itself the first time you do it. A handyman would charge you $100 to fix one hole. You can buy the tools and materials to fix 20 for less.
Match the method to the size of the hole. Use thin layers. Sand more than you think. Prime before you paint. That’s the whole job